As you may have gathered by now all things are not well in 'Mikki-land' and it is necessary for me to close down the Mavens. I have to focus on my own business so I don't end up living under a bridge beading out of a shopping cart.
The blog will still be here for you to access the info we've shared.
I hope you will all continue to support the bead artists and designers we've featured...it is the support of the designers that keeps the art alive!
Beki Haley has a new Facebook group that I think Maven readers will be interested in...."All About Beadwaving" where you can ask lots of questions and get great information and advice.
Me? I've had to make lots of changes and still making them...Mikki 2.0
I'm back doing my own blog www.TheBeadedCarpet.blogspot.com and there's more about my struggle/path over there.
Bead On!
Mikki

Wednesday, September 17, 2014
Friday, August 1, 2014
Vacation Mode
Yes, the Mavens are going into vacation mode for August.
August is very much a busy time for designers who teach, as class submissions need designing (myself included this year...eek) and quite honestly we need a break :)
Of course the blog will still be here and you can still access the many tutorials we have just in case you missed one.
When we come back we will be refreshed and chatty no doubt with info on our class schedules and new designs.
As you may know our designers sign up for a year and that year has come to an end for Patrick.....we thank him for his contributions, wish him well and hope life and beads bring him everything he deserves.
So...we'll be back....have a great August....don't forget the sun screen and we'll see you in September :)
Cheers,
Mikki
Cheers,
Mikki
Friday, July 25, 2014
Tutorial - Patsy Earrings ~ Neva
A few technical glitches on getting the full tutorial on the blog so click the picture for a downloadable copy :)

Patsy Earrings - you can change the colour of these earrings by one bead :)
Thursday, July 17, 2014
MORE BEAD STORAGE IDEAS
I am aware other Mavens have shared their
storage ideas and each has been valuable in their own right. Every beader is always looking for ways to store their 'stash' and I wanted to share an idea I have had
for a long time and only recently put into place.
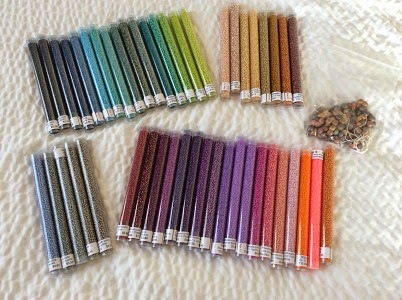
I had been to a Bead Show in Sydney in
April and bought lots of new colour seed beads. In May I travelled to the US to attend the Bead & Button Show and came home with
4.5kgs (10lbs) of seed beads in my bag, not to mention other types of beads I had bought.
I usually stored my size 11 seed bead tubes in small drawers in colour tones i.e. greens and blues together, reds, oranges and yellows together etc. BUT with all my new stash the drawers were too small.
I needed to find a new way of storing all
these tubes of seed beads. I tried a couple of things, like laying them in
boxes - no, not happy with that - then I stood them on their ends with rubber bands around them, didn't like either.
I began to think I wanted to see the colours so that I knew
what I had. It was a comment and a picture from Barbara Briggs on Facebook showing me how
she stored the tubes on their lids so she could see the colour from the bottom of
the tube. That was when I remembered an
idea I had had ages ago.
Store them in PVC pipes in their colour
hues. What a great idea!!
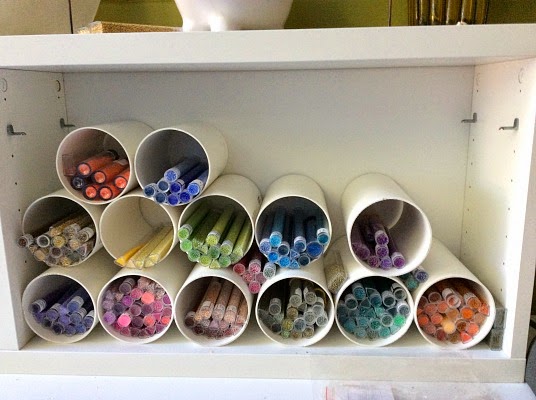
 Off I rushed to the local hardware store
and bought three lengths of 90mm diameter x 1 metre long PVC pipes. I also purchased a miter box to get a correct cut. I borrowed a mates hacksaw and away I went. Cutting, cutting, cutting. The pipes also needed sandpaper to remove any rough edges after the cuts. All cost about $25.00 and pretty quick and pretty easy to do.
Off I rushed to the local hardware store
and bought three lengths of 90mm diameter x 1 metre long PVC pipes. I also purchased a miter box to get a correct cut. I borrowed a mates hacksaw and away I went. Cutting, cutting, cutting. The pipes also needed sandpaper to remove any rough edges after the cuts. All cost about $25.00 and pretty quick and pretty easy to do. The PVC pipes come in various sizes from 125mm down to 65mm diameter so I am sure there is one that would suit your needs.

I then sat them on my worktable and placed in the seed bead tubes. Don’t they look pretty I thought! I was happy with this.

Problem #1 – you needed ‘book ends’ so the pipes didn’t roll. I had to place other storage
drawers at either end of the pipe display.
Problem#2 – if I wanted to lift up a ‘book end’ the pipes would roll again!
It was suggested to glue the pipes together but I didn't want anything that big to be permanent. I wanted the option to lift and move and reduce the quantity of pipes if I choose.
It was suggested to glue the pipes together but I didn't want anything that big to be permanent. I wanted the option to lift and move and reduce the quantity of pipes if I choose.
I felt I needed a wedge on
the pipes, or a pigeon hole kind of set up or something permanent to hold it
all in place!
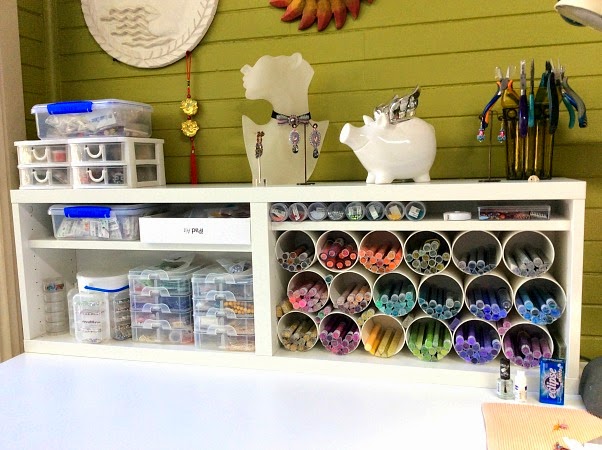
I decided to check out Ikea and see what
kind of shelving they had to accommodate these pipes. It couldn’t be too deep as I wanted to sit it on my worktable and didn't want to lose workspace. I discovered that DVD and CD furniture fitted
the bill and here is a link to the exact one I purchased.
Off I went and paid $50.00 for the
shelves. Came home, put it together, placed it on my worktable and put in the
pipes with the colours. Great, it all fitted, it works and looks good.
Problem
#3 – I had cut the pipes 165mm long thinking that would be a good idea. Seed bead tubes
are generally 150mm long. When I placed my tubes in the pipes they recessed into the pipe too much and made it difficult to lift out - not happy with that. I had to re-cut all of them again. This time I wanted the seed
bead tubes to stick out just a little for easy removal. The new lengths are
142mm long and you get 7 lengths from a 1 metre pipe after six cuts. Terrific, more for my
money - YAY!
Problem
#4 – if you are not careful when extracting the
seed bead tube you may pull the end cap off as they rub up against the other tube caps. I
learnt that pretty quickly. However, only a small number of seeds fell out as
they are laying flat and only the seeds at the end of the tube fell out so no BIG problem,
just a little one.
I have now been living with this system for almost a
week and I absolutely Love it!
Benefit #1 - Having the tubes jutting outside of the pipes a little makes it easier to handle. I found when removing a tube lift it up to the top first then lift it out, no pulling happens on the end cap and no seed bead spillage. YAY!
Benefit #2 - As I am working on a design I can see all
my colours, which helps me decide which colour will work with what I am making.
Being stored and hidden in a drawer you don’t get that immediate association.
Benefit #3 - they are within arm's reach of my workspace. Love being able to reach for them and not search for them.
Benefit #3 - they are within arm's reach of my workspace. Love being able to reach for them and not search for them.
Benefit #4 - I now have heaps of room for growth, more seed bead tubes to acquire. YAY!
Benefit #5 - The whole set-up looks good and has become part of the beading 'decor'. My beading space is set up in my dining room - or dining studio I call it LOL - when I have people over for dinner they like seeing my space and now it looks attractive as well.
So all in all it has been an easy exercise to undertake with a lot of benefits.
I hope my sharing this method gives you some ideas and helps you with your bead storage.
Enjoy!
Friday, July 11, 2014
C is for Creative Growth and Keeping Things Fresh!
I can't tell
you how many times I have heard someone proclaim that they aren't a creative
person. I have even said that very same thing to other people about myself.... LOL! I have no clue
what I was thinking!! Everyone of us is creative! EVERYONE! If you don’t
think of yourself as creative or a creative person, then you’re missing a great
opportunity to grow as a person – to become who you really are, who you want to
be and who you truly were meant to be.
We are all raised within a certain family, within a particular culture, and at a certain time period in life. Sometimes our inner self does not get the encouragement it requires. How we are parented, how we are treated, the social conditions we experience at the time will all certainly have an effect on who we grow up to think we are, and the surest way to kill someone's creativity is to judge or criticize them or tell them they can't do something.
I have heard creativity described as the “ability to synthesize – sifting through boundless amounts of data and perceptions. The goal of course is to come up with new and useful combinations of things or solutions to problems.” But its so much more than that. Its a willingness to be in a state of not knowing. It's to have curiosity about all the boundless, endless possibilities and a desire to take a risk and act on one's impulses without knowing or being able to predict what the outcome will be.

Create and make a vision board of where you want to go! You can't get there if you don't know where you are headed or have a map to guide you!

Make a list every night of
the five best things that happened in your day.
We are all raised within a certain family, within a particular culture, and at a certain time period in life. Sometimes our inner self does not get the encouragement it requires. How we are parented, how we are treated, the social conditions we experience at the time will all certainly have an effect on who we grow up to think we are, and the surest way to kill someone's creativity is to judge or criticize them or tell them they can't do something.
I have heard creativity described as the “ability to synthesize – sifting through boundless amounts of data and perceptions. The goal of course is to come up with new and useful combinations of things or solutions to problems.” But its so much more than that. Its a willingness to be in a state of not knowing. It's to have curiosity about all the boundless, endless possibilities and a desire to take a risk and act on one's impulses without knowing or being able to predict what the outcome will be.
Creativity isn't really an optional quality for us to decide we have to cultivate. Rather, consider, that
perhaps its our greatest untapped resource that lies within all of us as human beings;
that its truly needed in order for us to live up to our highest potential as living
creatures.
My
life is full of responsibilities and day to day tasks that quite often fill
every moment of my day with work, family and a multitude of other obligations.
I often feel like I don't have any energy left to cultivate any new growth or
creative pursuits, so often my personal explorations and self-fulfillment gets
put on the back burner for another day.
Simply put; life often has its OWN plans, and they usually
differ from mine. It's not difficult to
find myself feeling like I am stuck, headed nowhere and have landed myself in a
big rut! When this happens to me, I need a game plan. I figure this probably
happens to others just as often so I thought I would share some of my ideas for
recharging my creative battery when it's gone dead. Some are tried and true and
others are things I want to experiment with. Ready? Here goes....
Create and make a vision board of where you want to go! You can't get there if you don't know where you are headed or have a map to guide you!
Celebrate who you are
--all the little things that make you, you!
Your quirkiness and your individuality!
Don't be afraid to ask for
help. EVERYONE was a newbie at one time-we all have to learn and begin
somewhere.
Take a walk in nature and
listen to the music that surrounds you; leaves falling, wind blowing, birds
chirping, etc. Enjoy the peacefulness of it all!
Make direct requests to
the universe and be open to receive its gifts in return.
Count your blessings and
be grateful; each day is truly a gift and full of gifts to be received.
Hang out with happy,
healthy, deep thinkers who have your best interests at heart.
Ask for feedback from
people that you admire and respect.
Take a risk! One foot in
front of the other, one baby step at a time!
Don't fear failing or
making a few mistakes. Sometimes the Uh Oh's become the Ah Ha moments of one's
life.
Break from the beads and
explore a new desire.
Stare out the window and
daydream to your hearts content
Get to work or go out and
play; But commit to doing something!
Make a list of your ideas:
The good, the bad and the ugly! :)
Break the rules! It does a
heart good!
Read a book-Have an
adventure if even for an hour or so!
Its ok to be selfish at
times and do something nice for yourself!
Do one thing every day
that makes YOU happy!
Take out your beads and
just play with no goal or end result in mind.
Feeling overwhelmed? Focus
on one thing and see it through to completion.
Give yourself permission
to laugh, have fun and waste a little time.
Persevere!
We all need a break at times but giving up is not an option
Cook something yummy that
you have been craving for awhile!
Ask yourself "what
if" or "how can I" and be open to ALL the ideas you receive.
Think outside the box and
experiment with anything and everything.
Take a break from the
things you are supposed to do and do what you WANT to do.
Play with clay... there is
just something about doing something tactile that gets creative juices flowing.
Pick up a pencil and
doodle to your hearts content.
Learn how to say No!
Free form writing! You
will be surprised at the things that will come pouring out!
Get inspired by EVERYTHING
that surrounds you!
Listen to music that makes
you want to get up and dance and leaves you feeling alive!
Stop waiting for the
perfect moment. It doesn't exist! All that exists is the here and now!
Take yourself out for a
play date. Do something you have always wanted to do but for whatever reason,
haven't yet managed it!
and my personal, all time
favorite... Bead True to Yourself!! :)
Friday, June 27, 2014
Something A Little Bit Different From Mikki
When you go to the Bead & Button show you just have to take some of your work for show and tell. This year along with my latest designs I took a piece that was a bit different, something I made when I first started beading and it's not all beads.
My Kanzashi Purse was made as I was discovering bead weaving and has some of the first things I learned.....how to bezel a rivoli, a cellini spiral and probably my first ever beaded bead.


Well my little purse got a lot of attention and people asked me about the fabric technique. Kanzashi is basically fabric origami and was used (though stuck with rice glue not stitched) for Geisha head dresses....at least that's what my research told me. So I thought I would share the technique I developed so you can add it to your glossary of techniques and maybe use it in your designs.


My Kanzashi Purse was made as I was discovering bead weaving and has some of the first things I learned.....how to bezel a rivoli, a cellini spiral and probably my first ever beaded bead.
Well my little purse got a lot of attention and people asked me about the fabric technique. Kanzashi is basically fabric origami and was used (though stuck with rice glue not stitched) for Geisha head dresses....at least that's what my research told me. So I thought I would share the technique I developed so you can add it to your glossary of techniques and maybe use it in your designs.
Thursday, June 19, 2014
Essential Beading Tools ~ Neva

Generally, you run out of things, or you can't find them, or you just don't have them. In this article, I will look at some essential tools that will make your beading journey a little easier.
 Beading Mat - these can be different things but generally have the non-slip mat surface that doesn't allow the beads to roll. This makes it much easier to pick up with your beading needle.
The beauty of a bead mat is that it doesn't take up much room. Can be rolled for easy storage, or for travelling if you wish to bead away from your beading table.
It's also a good idea to have more than one bead mat. You'll find that sometimes you may get stuck on a project, and instead of packing it all up, you can put it aside and start on something else, on a different mat.
It's also a good idea to have more than one bead mat. You'll find that sometimes you may get stuck on a project, and instead of packing it all up, you can put it aside and start on something else, on a different mat.
If you do stringing or would like to see the overall effect of lengths, then a bead board comes in handy.
Also, your needles will bend out of shape. Don't panic! this is quite normal. The way you hold your needle is unique to you, so your needle will shape accordingly.

Thread - There is quite a variety of threads for beading in the marketplace. I am often asked which is better. My answer is this: It depends what you are working on and also a personal preference.
I say, try a few, if not all different threads available, and see what works best for you. Obviously some will work better in certain applications. for example; If you prefer to use Nymo, KO, C-Lon etc, then it easy to match the thread colour to your beads. Fireline has a different strength and the 2 main colours available blend well with most beads.
 Scissors - scissors are an invaluable part of your beading project. You need to know though, that not all scissors are the same. Fireline will blunt your scissors, so it's best to buy a pair specifically for Fireline with serrated jaws. Nail scissors are also good if you are cutting small curved areas in bead embroidery. They will follow the contours easily without the struggle. Large paper scissors are useful for cutting out paper templates for embroidery pieces. A dressmakers unpick tool or a large pin will also come in handy when undoing work. As it will allow you to select individual threads in between the beads.
Adhesive/Glue - Whether you need to glue backing on a piece of bead embroidery, glue a cab or gemstone, Soutache threads, or beads together, among other things, you'll need the appropriate glue to do the job. There are quite a lot of glues on the market but the main ones that are used for beading are E6000. G-S Hypo Cement, Diamond Glaze, and Araldite.
Remember when you use the glues, and it doesn't matter which one, to use them in a well ventilated area. Some of those fumes can be quite strong. Also, let the glue cure.... that way you can be sure that the piece won't move. Scoop - Scoops are an invaluable tool and
take on many shapes.
Scoop - Scoops are an invaluable tool and
take on many shapes. A scoop can be a teaspoon, a triangular tray with pointy corners, a long half tube thing, small flour/sugar scoops, measuring spoons.... or even a small piece of paper folded in two. Scoops will help you put your beads back in their tubes or containers. They will help you organise your beads into colour piles on the bead mat. They will scoop out beads from larger containers. they will help you pick up dropped beads... and the list goes on. If you have the triangular or dish shaped scoops, then they can also double up as mini bead trays.


Bead Stopper - These cute little coiled things not only stop your beads from slipping off the beading thread, but they also help control your tension when you start a piece. They also come in handy for keeping those small bags of beads closed when they dont have a zip lock.
Light - This is probably one of the most essential tools you will need. Without adequate lighting, your eyes will tire quickly, and become sore and irritated. Therefore reducing the amount of hours you bead. When you have the right amount of light, you can bead when inspiration hits you, that can be both day, and night.
Tape Measure/Ruler - You need one.... dont think you dont.


Thread Burner/Lighter - A handy tool to tidy up the thread ends that poke out of your beadwork. Also the lighter comes in handy when joining 2 pieces of Firline together. (you can find reference to this in earlier articles)

You dont need a fancy camera. In fact, even the camera on your mobile phone will do. You just need to create a record of what you create. It will also give you a date stamp, so in years to come, you can reference the photos to see when you actually created a piece.
If you get more adventurous with taking photos, you can invest with a Macro lens which will take really close shots. Also you'll then need some good lighting and a good set up etc.... but again, you can find reference in a previous article here on the Bead Mavens.
Paper & Pencil - This is a fairly obvious tool, but so many people dont use it. If you create Bead Embroidery pieces, then you may be some of the few that use it. Taking notes, and creating doodles of pieces you'd like to create is a great way of setting up a portfolio of ideas....
Display busts are also good for photographing your finished pieces on.

Even though some of you may have other tools you use when creating, this list is a fundamental list for beaders who bead with a needle and thread. It is also a list for use when creating with Kumihimo and Micro Macrame, and loomwork to name a few.
I hope you find this article helpful and it helps build yout checklist.
Happy Beading!
Neva
Friday, June 13, 2014
Post Bead & Button Post
Ahh.....the Bead & Button Show....the Mecca for those of us on Planet Bead.
Last week I and a zillion other bead heads were in Milwaukee for the largest bead consumer show in the world. It was my second year attending and I felt a little more at home, knowing a lot of the faces from last year, the agenda and the floor plans of the event. I've been back home five days now and I'm still digesting what I saw/fondled/drooled over and who I met/laughed with/hugged.
It is still very odd to me that I kind of get treated like a rock star, with people wanting to meet me, have their picture taken with me and even get my autograph (which I find highly amusing). It's like living in an alternate reality for a week. And I do my share of hero worshipping as I meet designers who have influenced and inspired my work....and maybe I'll get an autograph if I buy a designer's book :) This year the person who made my head explode was Diane Fitzgerald who sat and played with my motion pieces, chatting with me about what I do and the whole designing/teaching thing....oh...I held it together and behaved like an adult until she left and then I bounced up and down like a two year old. I mean.....that was the Grande Dame of Beading and she liked my stuff!!

I had my latest designs on show....the Put a Ring On It rotator cuff, and the upcoming Tilt-A-Whirl, Maypole and Skelter pendants. A little boy, about 1 yr old, was completely taken with Tilt....his eyes lit up and he swirled and tilted it gleefully, giggling when he got it to move....that was the moment I thought "I design toys" :)
I didn't to take as much video as I would have liked but I did manage to capture some of the craziness.....waiting for the showroom to open. Now be warned the video is a little 'hectic' and 'all over the place' but that's sort of what it's like while you're waiting for the doors to open. So many people, so much eye candy...you don't know where to look and of course the hustle and bustle of everyone else looking too. I do think I captured the feel of it...well...my feelings, yours may be different :)

Last week I and a zillion other bead heads were in Milwaukee for the largest bead consumer show in the world. It was my second year attending and I felt a little more at home, knowing a lot of the faces from last year, the agenda and the floor plans of the event. I've been back home five days now and I'm still digesting what I saw/fondled/drooled over and who I met/laughed with/hugged.
It is still very odd to me that I kind of get treated like a rock star, with people wanting to meet me, have their picture taken with me and even get my autograph (which I find highly amusing). It's like living in an alternate reality for a week. And I do my share of hero worshipping as I meet designers who have influenced and inspired my work....and maybe I'll get an autograph if I buy a designer's book :) This year the person who made my head explode was Diane Fitzgerald who sat and played with my motion pieces, chatting with me about what I do and the whole designing/teaching thing....oh...I held it together and behaved like an adult until she left and then I bounced up and down like a two year old. I mean.....that was the Grande Dame of Beading and she liked my stuff!!
I had my latest designs on show....the Put a Ring On It rotator cuff, and the upcoming Tilt-A-Whirl, Maypole and Skelter pendants. A little boy, about 1 yr old, was completely taken with Tilt....his eyes lit up and he swirled and tilted it gleefully, giggling when he got it to move....that was the moment I thought "I design toys" :)
I didn't to take as much video as I would have liked but I did manage to capture some of the craziness.....waiting for the showroom to open. Now be warned the video is a little 'hectic' and 'all over the place' but that's sort of what it's like while you're waiting for the doors to open. So many people, so much eye candy...you don't know where to look and of course the hustle and bustle of everyone else looking too. I do think I captured the feel of it...well...my feelings, yours may be different :)
And of course the stash I came away with .....it did take four days to accumulate this haul.
The show was brilliant! Do go if you can, you won't regret it.
A shopped out Mikki!
Friday, May 30, 2014
Final Friday Freebie
It's the last Friday of the month and that means a free tutorial....and this one is hot off the presses....I finished it just moments ago :)
The wonderful Perry & Kelly of Yorkbeads sent me some of their new Chexx beads to play with and this is the second design I have done using them....the first, "Clamstar" which also uses the new Piggy Beads is available free with purchase from Yorkbeads but this one, "Spinal Cord" is free to all.

Patrick and I will actually be demoing 'Spinal Cord' at the Yorkbeads booth at the Bead & Button show Friday and Saturday of next week, June 6th & 7th at 11 am.....so stop on by and see how easy and fast this fun rope is to make or show us your versions if you're fast :) Cheers, Mikki


The wonderful Perry & Kelly of Yorkbeads sent me some of their new Chexx beads to play with and this is the second design I have done using them....the first, "Clamstar" which also uses the new Piggy Beads is available free with purchase from Yorkbeads but this one, "Spinal Cord" is free to all.
Patrick and I will actually be demoing 'Spinal Cord' at the Yorkbeads booth at the Bead & Button show Friday and Saturday of next week, June 6th & 7th at 11 am.....so stop on by and see how easy and fast this fun rope is to make or show us your versions if you're fast :) Cheers, Mikki
Friday, May 23, 2014
Getting The Most From a Beading Class
Getting the Most From A Beading Class

First and foremost, be prepared
However, if you are expected to arrive at the class already knowing the stitches, learn them prior to the class if you aren't already proficient. There are many wonderful videos on line from which you can learn beading stitches, as well as step by step instructions in beading books, on websites, and in magazines. Review more than one source if time permits, and then practice so you are comfortable with the stitch(es) and any specified variations – i.e., increasing, decreasing, odd count, tubular, etc.
If you are purchasing a kit for the class, you can be assured the beads included will be appropriate for the design. Determine whether there are any additional items not included in the kit that you will need to bring to class. Thread and needles are not always supplied, and sometimes other materials, like focal beads, may not be a part of the kit, to allow students the opportunity to personalize a design.
If you will be supplying your own beads, make sure you have all of the materials called for, and in the appropriate sizes and quantities specified. Often material lists state supplies to make a specific size or length of the design. If you need a larger or longer size, take that into consideration when purchasing your materials. If you choose to make substitutions rather than using exactly the materials called for, know that your resulting design might look different (and not necessarily in a good way). The instructor may not know with certainty if a particular substitution will work, so proceed with caution if substituting. Consider sticking with exact supplies for the class project, and then substituting on subsequent pieces only after you have become familiar with all aspects of the design. This applies to all materials, including needles and thread. If a particular type or size is recommended, that is likely because it will give a result consistent with the class sample. Using an alternate may cause difficulty, such as making multiple passes through small beads difficult or not providing enough structural support for the design.
In addition, if you will be picking out your own materials, please, please do it before the start of class. It is both distracting and inconsiderate to be running around the store, shopping and asking for opinions on materials choices after the class has started. And it takes away from the learning time you have paid for.
Beyond the supplies needed for the design, there are some other items to bring to class to make your experience great.
Materials

In addition, if you will be picking out your own materials, please, please do it before the start of class. It is both distracting and inconsiderate to be running around the store, shopping and asking for opinions on materials choices after the class has started. And it takes away from the learning time you have paid for.
Here are a few of my essentials:

Work surface – some class venues supply beading surfaces to use in class, but some do not, so bring your preferred mat or tray if you are uncertain, or prefer having your own.
Scissors – please, never attend a beading class without bringing scissors!
Small beading lamp and extension cord – lighting at some class venues can be less than optimum.
Magnification – if you need it for beading at home, you will need it in class. Remember to bring the glasses you bead with, or an appropriately sized magnifier. Even the best instructors can't help you see the beads!
There are many other optional items that could come in handy. I've assembled a traveling tool kit in a zippered Mead pencil case that I take to all beading classes, both as a student and as an instructor.
My case holds the following items:

Be considerate of fellow classmates. Set up your space so you can bead comfortably, but be mindful of your neighbors' spaces too. Put your personal belongings under your chair or far away from the table, rather than next to, or around your chair. During class the instructor will likely want to check on your progress, or you may want assistance. Give the instructor unobstructed access to stand beside you without straddling your lunch tote.
Work surface – some class venues supply beading surfaces to use in class, but some do not, so bring your preferred mat or tray if you are uncertain, or prefer having your own.
Scissors – please, never attend a beading class without bringing scissors!
Small beading lamp and extension cord – lighting at some class venues can be less than optimum.
Magnification – if you need it for beading at home, you will need it in class. Remember to bring the glasses you bead with, or an appropriately sized magnifier. Even the best instructors can't help you see the beads!
There are many other optional items that could come in handy. I've assembled a traveling tool kit in a zippered Mead pencil case that I take to all beading classes, both as a student and as an instructor.
My case holds the following items:
 |
| Travel Beading Kit |
Pen/pencil for making notes
Mead Five Star Zippered
Pencil Case- Awl, tapered and with a sharp point for removing stitches or loosening unwanted knots
- Thread zapper
- Caliper
- Clip-on magnifiers
- Bead scoop
- Stopper clips
- Ruler or measuring tape
- Small zip locks for rounding up beads cut from strands or hanks
- A section of a drinking straw, slit along the length, to use as an adjustable armature for starting beaded tubes
- A chunk of microcrystalline wax in a case from The Container Store
- Tiny pliers to pull a needle through a tight spot, or for breaking beads (I know...don't judge!)
- Extra packs of needles, including “sharps” - short, sharp needles helpful in burying tails or stitching in tight spaces with short threads
- Additional comfort items to consider bringing include a sweater, a bottle of water, and a seat cushion.
Be on time! Arrive at the venue early enough to check in, meet the instructor, settle into your spot, make a quick bathroom visit, and purchase
any last minute materials. Be in your seat, ready to start at the appointed class time. It may seem obvious, but you and your fellow classmates are paying for this time so make the most of it. It's to your advantage to get as far into the design today, with the instructor present, as the time will allow, so use the time wisely.
any last minute materials. Be in your seat, ready to start at the appointed class time. It may seem obvious, but you and your fellow classmates are paying for this time so make the most of it. It's to your advantage to get as far into the design today, with the instructor present, as the time will allow, so use the time wisely.
Put your phone on silent, and if you must take a call during class leave the room. Go far enough away from the class that no one can hear your conversation. As you are waiting for class to begin, look through the instructions to familiarize yourself with the basic steps of the design, but it's a good idea to not start beading until the instructor opens the class. Sometimes you won't start at the beginning, and sometimes there are alterations to the written instructions.
During Class
Listen whenever the instructor addresses the class. You can be sure if she's talking to the whole class, you won't want to miss what she's saying – it could impact your results. Watch the demonstrations by the instructor. Even though you may be familiar with the technique, you may still learn something – a different way to hold the work, how to count rows, and many other tips are often shared during demonstration of steps. Don't offer your opinion to fellow classmates on how you would have made the design differently. I have seen this happen in many classes I have attended and I think it reflects poorly on the opinionated beader and doesn't enhance any one's class experience. There are many ways to accomplish things and you didn't design this project, so let her teach it her way.
The End of the Class
Nearing the end of the class, if you will not be finishing the design in class, read through the instructions for any steps you haven't completed and be sure you understand them. If you have questions about finishing, now is the time to bring them up, unless the instructor has indicated otherwise. Be sure you have a clear understanding of how to complete the rest of the design on your own.
Often at the end of a class students want to take their own photos of the class samples. Instructors usually don't mind but it's best to ask if you are uncertain of the instructor's preference. This is also great time to exchange phone numbers or email addresses with your classmates (aka new beading friends), and possibly schedule an additional time to meet to finish the design together. And finally, instructors love constructive feedback. If there was something the instructor said or did that really resonated with you, tell them! It helps them to become even better at what they do.
During Class
The End of the Class
Often at the end of a class students want to take their own photos of the class samples. Instructors usually don't mind but it's best to ask if you are uncertain of the instructor's preference. This is also great time to exchange phone numbers or email addresses with your classmates (aka new beading friends), and possibly schedule an additional time to meet to finish the design together. And finally, instructors love constructive feedback. If there was something the instructor said or did that really resonated with you, tell them! It helps them to become even better at what they do.

Whether you are attending one of the national beading events this summer, a destination beading retreat, or simply a class at your local bead store, I hope some of the ideas above will help to enhance your class experience. And by the way, if you're looking for a great class, I'm teaching two sparkly new, cup chain embellished designs at BeadFest Philly in August and I'd love see you in class.
Bead well,
Cristie
Friday, May 9, 2014
Are you Challenged??
Every once in a while my bead work seems to hit a standstill, or a beading plateau, if you will. I'm sure that happens to most of us at one time or another. Recently, I started to wonder what new ways I could come up with to challenge myself, and more importantly, I began to question what others do to challenge themselves and take their bead work to new and previously unexplored levels. So I asked my fellow Mavens for their input, and the following post revolves around what they had to say on the subject at hand.
The following are excerpts of their complete answers. The answers were varied, but they seemed to revolve around some universal themes.
The following are excerpts of their complete answers. The answers were varied, but they seemed to revolve around some universal themes.
I, basically, posed two questions to them; the first one being:
1) What do you do as an individual to take your bead work to a new level?
Mikki Ferrugiaro: I compete with myself. It's a constant desire to improve and learn. If we don't sit on our laurels and have the view that we are only as good as our latest design then the new levels just happen.
Patrick Duggan: In a nutshell, Experiment, experiment, experiment. I love sitting and playing especially with new beads, new colors.
Heather Kingsley - Heath : Refuel the inspiration. Get excited by a new idea. Make myself use new color combinations. For me, without inspiration the creative batteries go flat. So I take lots of random photo’s, keep a folder of images I’ve found in magazines, visit exhibitions, galleries, museums.
Check out below how Heather drew inspiration from Architectural Elements and Nature to design her Relic Pendant and Martha's Moth.

 |
| Relic Pendant by Heather Kingsley-Heath |

 |
| Martha's Moth by Heather Kingsley-Heath |
Neva Brown: I push my own boundaries.... I explore the techniques I know, and trial techniques I don't. As I cant read tutorials, everything I do is trial error. I combine techniques, and am constantly sourcing inspiration from my surroundings. I don't want to bead like everyone beads, I want to create something that is unique, that will make my future customers appreciate the individuality of the piece.
Christie Prince : Some of the things I do to take my bead work to new levels includes coming up with new ways to use a familiar stitch, like I did in my Chain of Jewels design, where I figured out a way to divide and rejoin strips of herringbone in a way I'd not seen done before.
And, two;
What do you do to challenge yourself when it comes to bead work?
Mikki Ferrugiaro: Ask myself the question "What is possible?" My latest series "Amusement Park" is a result of that. Each piece is a challenge to engineer. For me it's not about what's pretty, it's about where I can go with the beads, pretty helps of course but it's secondary to what I can make the beads do.
See what happens when Mikki asks "What is possible?". She comes up with designs like the one below, entitled Maypole!
 |
| Maypole by Mikki Ferrugiaro |
Patrick Duggan: If we have an overseas visitor coming to teach I like to meet them and generally enroll in one of their workshops. Just to see what they teach like and learn from their work.
Heather Kingsley - Heath: A lot of what I do happens without really defining it out loud, so it was interesting to stop and think about how to describe the processes. When I want to up my game, I remind myself to not apply rules. It’s easy to slip into rules and patterns of doing things you have made up for yourself, but consciously stepping away from them makes you think through problems and find solutions in new ways.
Neva Brown: I enter competitions and challenges.
I always try to better my last creation.
I am also writing tutorials even though I cant read them.
I sometimes limit what I can use from my stash, to push me to 'get creative'
I sometimes set myself time limits for a piece, that way my muse has to get a move on.
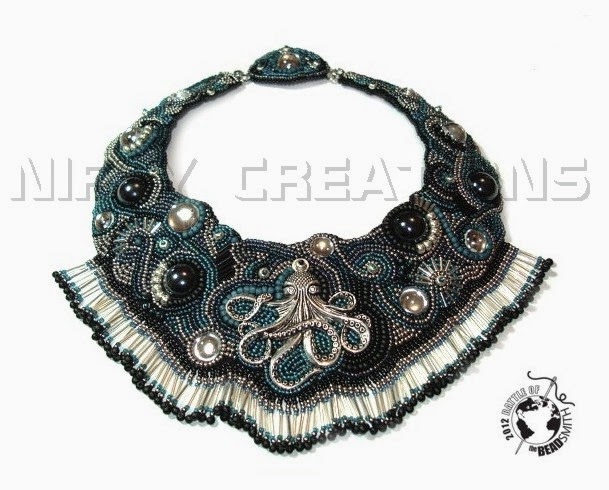 |
| Coralline by Neva Brown |
The picture above is entitled, "Coralline" and it was Neva's first entry into the BOTB contest. Here's what Neva had to say about her entry.
"Named Coralline, the inspiration came from the Octopus focal and its life in the deep ocean. The focal and the beads really guided me, but I really wanted to show the depth of the ocean with its deep greeny blue hues and tinges of sparkle from the sun shining on the water. The octopus showed me how it would move, and in its movement, create waves and bubbles in the water."
"Named Coralline, the inspiration came from the Octopus focal and its life in the deep ocean. The focal and the beads really guided me, but I really wanted to show the depth of the ocean with its deep greeny blue hues and tinges of sparkle from the sun shining on the water. The octopus showed me how it would move, and in its movement, create waves and bubbles in the water."
The Second picture is entitled, "Icelandic Swirl" and was created for a challenge called Rock Pools. One of the stipulations for the challenges was that you could use only one color for the piece. Neva chose Turquoise and varying hues of that color.
Here's what she had to say about her creation:
"I really wanted to show how water travels down a waterway, sometimes gently and sometimes swirling, as shown by the two differing ropes. As the water hits some rocks, it stumbles and swirls over more rocks, and caresses the creatures that live on the rocks, before it settles in the pool."

Christie Prince: One of the things I do to challenge myself when it comes to bead work is when I see a piece of costume or fine jewelry that I admire, I try to figure out a way to make the piece from beads and other components.
I love how Cristie used this Cartier Diamond bracelet to translate to and inspire her design, Just Srewin' Around!

 |
| Just Screwin' Around by Cristie Prince |
Its only fair that if I am going to ask these questions of my fellow Maven designers that I answer them as well. :)
Question one:
Twyla Harbick: I like to learn new things. In order to accomplish that I sometimes will work a fellow designers tutorial or tackle something that has me feeling a bit intimidated. I've found that almost everyone has a different way of doing things or creating a new approach to the same things and almost always, I learn something I didn't know.
Question Two:
This may sound silly, but I like to pretend the piece I am working on is something I will be entering into a competition or contest. There seems to be something about that mindset, that for me, brings out my better nature and makes me strive to do the very best work that I can at that moment.
Doing this post proved really insightful for me. While I stated before that the themes in the answers I received seemed to be universal revolving around the use of restrictions or the lack of them, experimentation, new techniques and learning how to play, everyone seems to have their own unique approach as to how to accomplish those things.... and that's what I found fun and insightful. I love when we all come together and share what works for us as individuals because you just never know how, when or why something you share will touch someone else's life or help them to reach a goal they are striving towards. In that light, I hope you each will post a comment about how you challenge yourself and how you take your beadwork to new levels. :)
Remember.... Bead True to Yourself!
Subscribe to:
Posts (Atom)